Predefined Button
Clicking this button will open a menu with a few Paste2 application and search examples. Selecting any of these examples will fill all required fields and assign an icon (10) after which a new Paste2 action will be created when the user clicks the "Submit New" button.
Edit Button
When a user selects a previously defined action in the actions list-box (1) and clicks the "Edit" button, all fields will be populated with information related to the selected action. The icon associated with the action will also change to the icon the user has previously chosen for the action.
Any changes made to fields 2, 3 and 4 in the main image above will be updated once the user clicks the "Edit Done" button.
Delete Button
When a user selects a previously defined action in the actions list-box (1) and clicks the "Delete" button, the action will be removed from the Paste2 interface. This action can not be undone. If an action was deleted by mistake, the user will have to set up the action again.
Edit Done / Submit New Button
When editing or creating a new action, this button's text will change accordingly. Click this button to submit changes that will be reflected on the Paste2 interface.

In the main image above there is no "Submit New" button. This is because the text of the "Submit New" button changes to "Edit Done" when in edit mode.
New Button
Click this button to create a new Paste2 action.
(see creating new Paste2 action further down this page for more information.)
Cancel Button
Click this button to cancel an edit operation or creating a new action. All fields will be cleared when this button is clicked.
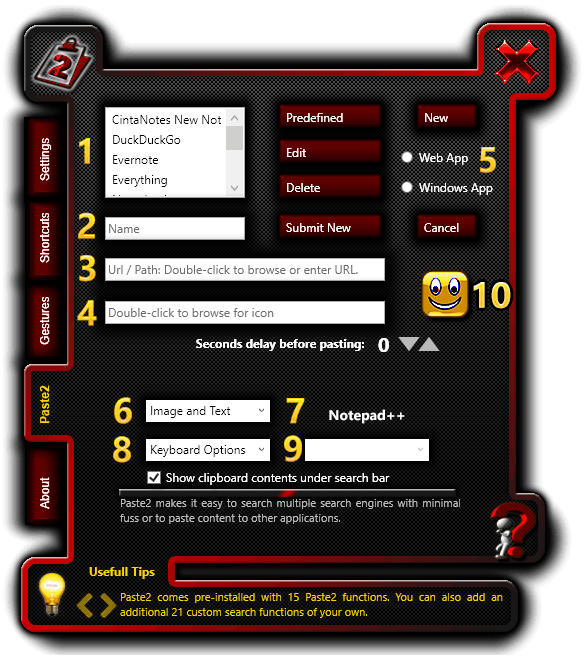
1. Actions List-box
1 in top image
This list-box lists all custom actions set up by the user. After selecting one of the entries listed here, the user may then edit or delete the action by clicking the relevant button.
2. Description Field
2 in top image
When creating a new action or editing an existing one, use this field to enter a short description of the action. The text entered here will be displayed on the Paste2 interface when a user hovers their mouse over one of the available Paste2 actions. The same text will also appear in the action list-box (1) and keyboard action drop-down combo box (9)
3. URL / path field
3 in top image
When creating or editing a web application, this field will contain the URL needed for this action. If it is a windows application this field will contain the path to the action's executable file.
4. Icon Path
4 in top image
Contains the path to the icon file associated with the action. Double-click to browse for a new icon or image file.

Users can also click the icon image (
10) to browse for a new icon or image file to associate with the action being created / edited.
5. Application Type
5 in top image
Specify whether the action is a web or windows application.
(see creating new Paste2 action further down this page for more information.)
6. Third Party Editors Drop-down Combo box
6 in top image
Users can optionally specify a third party text and image editor to use with the screen-shot and notepad Paste2 actions. When no third party editors are specified, Paste2 will default to using the natively installed windows paint program for taking screen-shots and the windows notepad application when using the Paste2 Notepad action.
If an editor is specified here, these editors will be used when a user right-clicks on the screen-shot and notepad icons on the Paste2 interface. A left click on these icons will use the default editors.
7. Third Party Editors Label
7 in top image
This label will be updated to reflect the editor chosen by the user when the selected item in the Third Party Editors Drop-down Combo box (6) changes. Clicking this label will allow the user to change the third party editor used to another by browsing for the executable application file the user want to use.
8 & 9. Keyboard Combinations
8 & 9 in top image
When the user is busy typing out a search phrase on the Paste2 interface, it is easier to simply press enter to perform a search than going back to the mouse to click the Paste2 action the user wants to use.
Using these two (8 & 9) drop-down combo boxes, the user can specify which Paste2 action to use when pressing the Enter key, Control + Enter and Shift + Enter
10. Action Icon
10 in top image
Represents the icon associated with the action. When creating a new action or editing an existing action, the user can click this image or double-click the Icon Path field (4) to browse for an icon or image file to associate with the action.
The Icon shown here will also be used to represent the action on the Paste2 interface.
Creating a new Paste2 Action
When a user clicks the "New" button, the first thing they will have to do to continue will be to specify if this action is a web or windows application (5). Fields 2, 3, 4 and 10 will also be invisible until the user has specified if this is a web or windows application.
Once a selection between a web or windows application has been made, enter a short description in the description field.(2)
Creating Web Applications
For web applications, enter the URL for the web application in the URL / Path field (3). To obtain the URL, look at the address bar when performing a search in your browser once the search results are returned.
For instance, if I do a search in internet explorer at www.duckduckgo.com for FunMouse, the address bar will look something like this once the search results are returned:

Copy this URL into the URL / Path field (3), but replace the search query with [SEARCHTEXT]
In other words,
https://duckduckgo.com/?q=funmouse&udf=7&ri=con
will become
https://duckduckgo.com/?q=[SEARCHTEXT]&udf=7&ri=con
Creating Windows Applications
For windows applications, double-click the URL / Path field (3) to browse for the executable application file to use for this action. When creating a windows application a new user interface element will become visible allowing the user to specify the amount of time to wait before pasting to the application.
(see image below.)
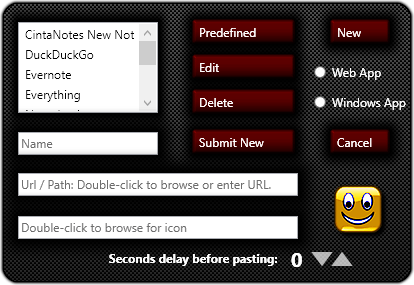
Click the up and down triangles or scroll the mouse wheel while hovering the mouse pointer over the triangles to specify the amount of time Paste2 should wait for the application to open before pasting to it.
From this point on, the procedure is the same for creating both web and windows applications. All that is needed now is for the user to choose an icon to associate with the action. This can be done by either double-clicking the icon path field (4) or clicking the icon image (10)
Now that all required fields have been completed, click the "Submit New" button to save the new Paste2 action.

 This part of the interface will show help messages when hovering over any user interface element Clicking on the blue question mark image will take the user to this page.
 This area of the interface displays tips relevant to this section of the FunMouse settings program. Click the directional buttons to see next and previous tips.