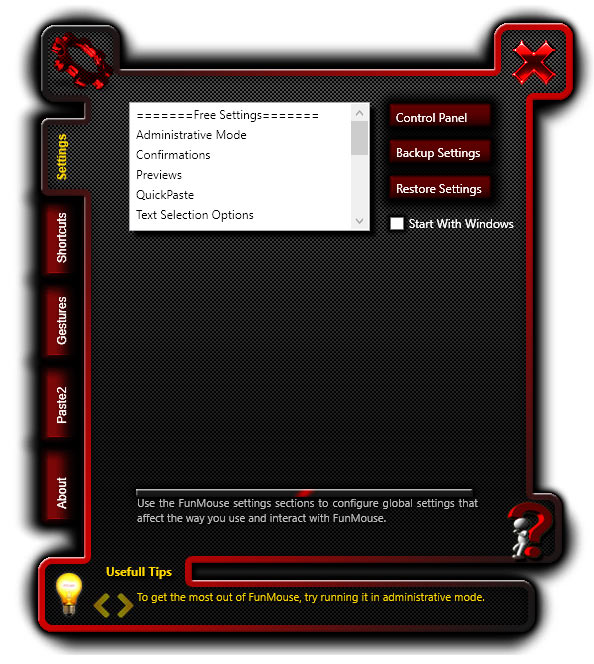
The Settings tab is where you can find most of the settings in FunMouse.
Control Panel Button
Clicking this button will open the standard windows mouse control panel application.
Backup Settings Button
Clicking this button will make a backup of all your settings. FunMouse also stores icons for the QuickLaunch toolbar as well as spell check dictionaries associated with the currently logged in user's account in a hidden folder under the My Documents folder. When you make a backup of your settings, these files are also copied.

FunMouse stores application information on a per user basis on each computer, meaning a computer with multiple users can all use FunMouse with their own individual settings.
Restore Settings Button
When you click this button you can browse to where you have a previously backed-up settings file for FunMouse. The file you select will overwrite your current settings and restore it to the state of the backup file.
All FunMouse backups are created under the root of the current user's "My Documents" folder as a zip file. All backup files have the format: FunMouse Backup - Current Date.zip
FunMouse also automatically makes a backup every time the program is successfully started. However, unlike manual backups, this is only a backup of your settings file which funmouse uses in case your settings file ever gets corrupted or FunMouse experiences an uncontrolled exit.
Administrative Mode
For the best possible experience with FunMouse, it is highly recommended you run FunMouse with administrative rights.
A big portion of FunMouse's functionality lies in the application that is currently active (Usually, but not always, the topmost window). If FunMouse is run in normal user mode and a program with elevated privileges (such as the windows task manager) has the focus very few of FunMouse's functions will work till the focus shifts to an application with normal usage rights. This is the equivalent of clicking the disable button on the FunMouse Information Hub.
When FunMouse is run for the first time, it is launched in normal user mode. However, upon first execution a dialog is displayed asking the user to restart in admin mode. If FunMouse successfully restarts in admin mode, the application automatically sets this as the default mode in which FunMouse should start.
When running an application with elevated privileges, any programs launched from this elevated application will be launched with elevated privileges as well. This can have undesired effects such as drag and drop operations not working as well as a few other restrictions due to higher application security credentials.
When FunMouse opens, it also opens a helper application (funmousehelper.exe) in normal user mode. The purpose of the helper application, among other things is to launch any application requested by FunMouse with the correct user rights to prevent these undesired results.
Confirmations
If the check-box to show confirmations is checked, FunMouse will give a very brief (1 second) visual confirmation every time a mouse gesture, hotspot shortcut or extra button assignment is executed, indicating which action was performed as well as showing a graphic to indicate which extra button, gesture or hotspot function executed it. (See example below)
Extra Button Assignments
Left and right mouse buttons are not considered extra mouse buttons. Buttons that qualify as extra mouse buttons are:
-
Mouse middle button
-
XButton1 (back button located on the side of the mouse under right thumb position)
-
XButton2 (front button located on the side of the mouse under right thumb position)
-
Mouse Wheel Tilt Left
-
Mouse Wheel Tilt Right
Not all mice have all the buttons described above. Consult your mouse documentation.

Scrolling the mouse wheel when hovered over the task-bar will adjust the system volume.
(See Miscellaneous Settings)
Each of the extra buttons described above can have a different function assigned for three different scenarios. These are:
- When the mouse is over the task-bar.
- During QuickSwitch.
- Default (when mouse is not over the task-bar and QuickSwitch not invoked.)
Previews
Because FunMouse allows you to assign mouse gestures and hotspot shortcuts on a per application basis, remembering which shortcuts you assigned to which gestures or hotspot functions can be a bit daunting in the beginning.
To make it easier for users to remember which shortcuts they assigned to different applications, FunMouse provides an option to show a preview of shortcuts available when the user moves the mouse close to the proximity of a hotspot side.
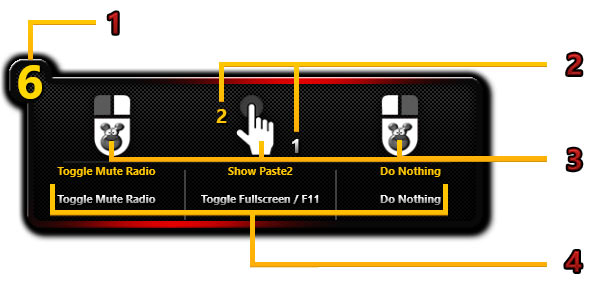
1. Hotspot Side
This number in the image example above indicates the mouse pointer is in the vicinity of hotspot side 6. This number changes as the mouse pointer is moved around the screen to reflect which hotspot side is being approached.
For mouse gesture previews, this number will be replaced with one of the 4 directional arrows. See further down for more.
2. Touch Requirement
Indicates the number of touches required to execute the touch action for the hotspot side in question. The top number on the left indicates the number of touches required for the active application. The bottom number on the right indicates the number of touches required when QuickSwitch is invoked.
To prevent shortcuts being executed accidentally, it is recommended to specify a double-touch requirement for active (or default) application shortcuts. Single touch can be specified for Quick-Switch (global) shortcuts.
It is not a good idea to assign left and right double-click shortcuts to hotspot sides when the side in question requires only a single touch for touch shortcuts.
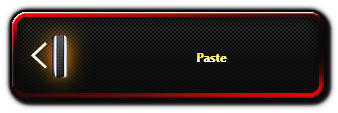
3. Shortcut Type
Images indicating left double-click, touch and right double-click actions. Look at text below these images to see which shortcut actions are assigned to each action.
For mouse gesture previews, these images will be replaced with images depicting the type of gesture movement required to perform or execute a shortcut action.
(See further down for more.)
4. Assigned Shortcuts
This area shows the actual shortcuts that were assigned to the actions corresponding to the images above it.
The top line (green) of text shows shortcuts assigned to the active application (or default). The bottom line (Grey and white) shows the shortcuts corresponding the images above it that will be executed when Quick-Switch is invoked.
The preview window shows the Global (QuickSwitch) shortcuts as well as the shortcuts for the active application. If the active application changes to another application for any reason, the preview text will be updated to reflect the shortcuts available to the new active window.
Remember that global (Quick-Switch) shortcuts will always remain the same, no matter which application is active or has focus as only one global shortcut action can be assigned to each hotspot mouse function or gesture movement and extra button assignments.
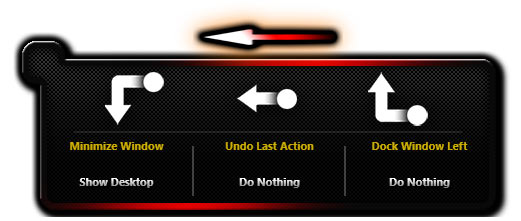
Mouse Gesture Previews
 To see a preview for mouse gestures for the active application, simply press down and hold the right mouse button anywhere above (not on) the task-bar.
The previews will be displayed along the edges of the user's screen like in the example to the right.
Mouse gesture previews follow the same logic as hotspot previews. (See large example below.)
Quick-Paste
Use this section to enter Quick-Text snippets you frequently have to type. Simply select a Quick-Text slot, enter or paste text in the text area below it to create the Quick-Text entry. For already existing QuickText entries, any changes you make in the text area will immediately update the Quick-Text entry.
(See Quick-Paste for more.)
Quick-Launch Options
This section only has one setting to show the Quick-Launch Toolbar when the mouse pointer touches the bottom part of the task-bar. This setting is checked by default.
When this setting is checked the Quick-Launch Toolbar will appear when the mouse pointer moves within 3 pixels of the bottom of the task-bar. In the example image below this is depicted as when the mouse pointer moves below the yellow line at the bottom of the task-bar.

Quick-Launch Toolbar 1
Use this section to set up and customize the Quick-Launch Toolbar. Shortcuts can be added by browsing for it or dragging and dropping an application's executable file onto the drag & drop spot. Users can also rearrange the order of shortcuts on the toolbar.
When editing this section, the Quick-Launch Toolbar will automatically appear in its usual location, however, when in edit mode, clicking on shortcut icons will take on a new function. (See image and explanations below.)
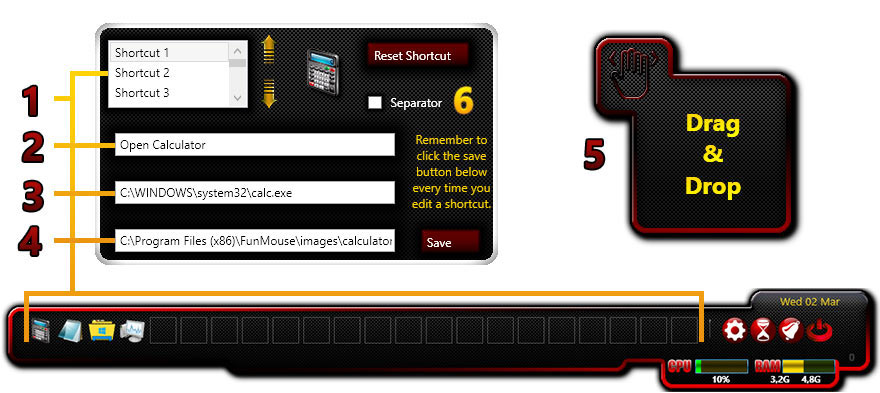
1. Shortcut Icons
When you select an icon on the toolbar it's counterpart shortcut slot will also be selected in the list-box and vice-versa (1). If the shortcut slot is already assigned a function, fields 2, 3 and 4 will also be filled and if it is a separator the separator check-box (5) will be checked.
 The up and down arrows can be used to rearrange the order of how the shortcut icons appear on the toolbar.
2. Description
Enter a short description to identify the function of where this shortcut points to. This description will also be used to indicate the function of the shortcut when the toolbar is not in edit mode.
3. Target Application Path
Double-click this field to browse for an application or shortcut file or drag and drop an application or shortcut onto the drag & drop window.
The drag & drop window will always stay on top. This makes it easy to switch to the desktop or the windows file explorer to find the application or shortcut file you're looking for and drop it onto the window.
4. Icon Path
When you create a new toolbar shortcut by either browsing for an application or shortcut file, or dropping it on the drag & drop window, FunMouse will try to extract the icon associated with the program it points to.
In some cases you may not be happy with the default icon associated with the program or if FunMouse should fail to extract the correct icon, you can double-click this field to browse for an icon or png image file to represent your shortcut.
5. Drag-and-drop Window
Drag program files or shortcut files onto this window to create / edit a shortcut.
6. Separator Check-box
Check this box to insert a separator rather than a shortcut to a program.
The separator is just a standard image file FunMouse uses to represent a separator. Feel free to browse and replace it with your own if you are not satisfied with the default separator image.
The toolbar will not show spaces between shortcuts if you (for example) create a shortcut for shortcut slot 1 & 3 and leave slot 2 blank.
To create spaces between shortcut icons on the toolbar, make the shortcut slot you want to be a space a separator, then double-click the icon path field (4) to browse for the BlankSpacer.png file in the Icons sub folder under the main FunMouse folder.

Whenever you have added a new shortcut or made changes to an existing shortcut you have to click the save button before selecting another shortcut slot or your changes will be lost.
Reset Shortcut Button
Clicking this button will clear all fields and reset the shortcut slot.
Save Button
Saves the current shortcut slot and refreshes the toolbar to reflect the changes. If you fail to click this button before selecting another shortcut slot all changes you have made will be lost.
Selection Options

The selection tools pop-up eliminates two extra clicks needed to copy, paste, cut and delete text. Without FunMouse a user will have to select text, then right click the selected text and lastly click the option they want to perform.
This tool also makes it easy to replace the selected text with QuickText snippets or the last 10 text entries stored on the windows clipboard.
The selection tools pop-up also contains a handy spell check utility to check spelling from any windows application.
The selection tools pop-up only appears when the mouse pointer changes to the I-beam cursor. This means the tool will also appear on most un-editable text such as text on most web pages. In rare cases where the I-beam cursor does not appear when hovering the mouse over text the tool will not appear. In these circumstances the user can still perform actions on the selection by right-clicking the selection and selecting an option from the resulting pop-up menu.
1 & 2. Double-Clicks and Selecting Text
 Check the boxes (1, 2) above to have the icons on the left pop up just below the mouse cursor. When the window first appears, all icons have an opacity of 50%. Hovering over an icon or scrolling the mouse wheel to select an icon will change the selected icon's opacity to 100% visible.
When moving the mouse pointer upwards towards the screen more than 60 pixels away from the icons will close the pop-up. Note that any other normal text operations like dragging the selected text, clicking the mouse or typing will also cause the pop-up to close.
Whenever you see the selection tools pop-up appear, while you can select an icon by hovering above and clicking it, it is much faster to simply scroll your mouse wheel till the icon you want is highlighted and click down with the left mouse button. As long as one of the icons is highlighted, it does not matter that your mouse cursor is not hovering over the icon.
Sounds
FunMouse makes use of sounds to give audible feedback that a certain function was executed successfully.
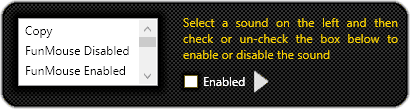
When a sound is selected in the list-box on the left in the example image above, the "Enabled" check-box will reflect if the sound is played or not. To disable a particular sound effect, just un-check the "Enabled" box for the selected sound. Press the triangle to hear what the effect sounds like.
While all sounds can be enabled or disabled, it is recommended to leave the sounds for enabling and disabling FunMouse enabled as there is no visual indication in full screen application like games.
Statistics
Only have two options to either display units for distance in the FunMouse Information Hub window using either the metric or imperial measurement system
Updates
Check this box to have FunMouse check for program updates when it starts. Click the "Check Now" button to perform a manual check.
Everything below this point is where we will document new features after adding them to FunMouse. Further documentation can also be found on the
Miscellaneous Settings page.
Webmail Notifications
Rather than leaving your email client open, taking up valuable system resources, FunMouse can poll your mail accounts (up to 3) at regular intervals to check for new mail. Because FunMouse takes up much less system resources (cpu, ram etc), this feature can help make your system more responsive by free up resources that would otherwise be used to keep your email client or browser open on your web-mail site.
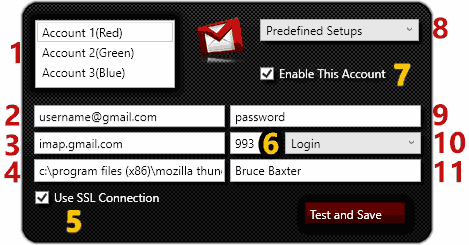
1. Account
FunMouse allows you to check up to 3 mail accounts. Accounts are designated a color to make it easy on to identify which account received mail on the Quick-Launch Toolbar. Use this section to select the account you want to edit.
2. Account Username
Enter the username you use to access email for the account you are editing. This would normally be your full email address, but it may differ depending on who your email host is.
3. Account Imap Address
Enter the imap host address as supplied by your email provider.
4. Account Action
This field allows you to specify what happens when you click on the account icon on the Quick-Launch Toolbar. If you make use of a windows program such as thunderbird, outlook, outlook express, etc to view your mail, double-click this textbox to browse to where the executable file for the program you are using can be found.
To open your web mail client in your browser, specify the internet address you want to open when clicking on the account icon on the Quick-Launch Toolbar here. Ex. https://www.gmail.com
5. SSL Connection
Check this box if the connection requires an ssl connection. This information will be provided by your email provider.
6. Account Port Number
Enter the port number for the account as supplied by your email provider.
7. Enable Account Check-box
Check this box to instruct FunMouse to check this account for new mail. If unchecked, the account's connection information will be saved, but FunMouse will not include the account when checking for new mail.
This box will automatically be checked when you click the "Test and Save" button when a successful connection was made.
8. Predifined Setups
We made it easy for you to set up account with 3 of the biggest email providers, namely: Gmail, Outlook.com and Yahoo. When you select one of these providers, the correct connection settings will already be entered in the form fields for you. All you have to do now is supply your username, password, the action you want performed when clicking on the account icon on the Quick-Launch Toolbar and an account name.
9. Account Password
Enter the password you use to access email for the account you are editing.
10. Authentication Method
Select the authentication method to access the account as supplied by your email provider.
11. Account Name
Enter a short description or name to identify the account.
Webmail Options
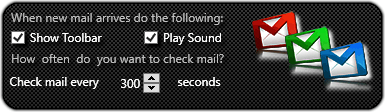
Show Toolbar
Check this box to have the Quick-Launch Toolbar briefly pop up, showing the amount of emails for all accounts whenever new mail arrives.
Play Sound
Check this box to get an audible indication whenever new mail arrives.
Mail Check Frequency
Use the up / down spinners to tell FunMouse how often it should check for new mail.

 This part of the interface will show help messages when hovering over any user interface element Clicking on the blue question mark image will take the user to this page.
 This area of the interface displays tips relevant to this section of the FunMouse settings program. Click the directional buttons to see next and previous tips.